INDEPENDENT PROJECT GUIDE
Design, build, and present on amazing science this summer!
This is a guide to help you complete your individual project with Project Exploration this summer.
The end goal is to present your experiment at the end of summer, so make sure to take as many photos, videos, and recordings of the project as you will need! We’re excited to help you with your projects and make sure to reach out to your facilitator if you want a helping hand.
Getting Started
Step One: Brainstorming a Topic
How To Brainstorm
What topics are you curious about?
Choosing a Topic
Possible Ideas and Topics
Astronomy
Biology
Chemistry
Earth Science
Electricity
Inventions
Physics
Plants
Your turn!
Tip: if you’re not sure which topic to choose, think about the questions you have about the world around you. Are you fascinated by airplane engines? A technology project could be fun! Love to bike? Maybe explore friction through a physical science project.
Step Two: Asking Questions
Ask the Right Question
Often, scientists’ questions begin with:
How, What, Which, Why, or Where
Examples of How Questions
- How does soil pH affect flower growth?
- How do projectors work?
Examples of What Questions
- What is the strongest bridge that can be built with fewest materials?
- What kind of yeast produces carbon dioxide the fastest?
Examples of Which Questions
- Which water filter produces the cleanest water?
- Which household cleaner fights bacteria best?
Examples of Why Questions
- Why does humidity change fungal growth?
- Why does guacamole go brown?
Examples of Where Questions
- Where is the best spot to plant soybeans?
- Where do worms move the fastest: dirt, cement, or grass?
Your turn!
My project is about _________________, and I want to answer the following question: ________________________.
Moving Forward
Step Three: Creating a Hypothesis
What is a Hypothesis?
Is a Hypothesis the same as a guess?
For example...
However...
Your turn!
I hypothesize that the answer to my question is ___________________________ because of these reasons: ________________________________________________________________________________________________________.
Step Four: Assembling Materials
What counts as Materials?
For example...
Example Materials
5 water pitchers
5 different types of filters
pH test strips
Journal
Pencil
Your turn!
Step Five: Identify Variables
What is a Variable?
- The scientist manipulates the independent variable
- The dependent variable is what the scientist measures or observes
- The controlled variables stay constant throughout the experiment
Example One...
A scientist conducts an experiment to determine whether fuel types affect the engine’s performance in a car.
Independent Variable: fuel type
Dependent Variable: engine performance
Controlled Variable: car, driver, driving location and speed
Example Two...
A study was conducted to determine the effect of climbing to high altitudes on a climber’s memory.
Independent Variable: altitude
Dependent Variable: climber’s memory
Controlled Variable: the test used to measure the climber’s memory, location
Your turn!
What are the variables in your project?
Experiment: ______________________________________________
Independent Variable: _________________________________________________________
Dependent Variable: __________________________________________________________
Controlled Variable: __________________________________________________________
Getting Messy
Step Six: Writing a Procedure
What is the Procedure?
Think of it like a recipe, or a to-do list, which somebody else could follow after you.
How many tests should you do?
Example Procedure...
- Number each battery so you can tell them apart.
- Measure each battery’s voltage by using the voltmeter.
- Put the same battery into one of the devices and turn it on.
- Let the device run for thirty minutes before measuring its voltage again. (Record the voltage in a table every time it is measured.)
- Repeat step 4 until the battery is at 0.9 volts or until the device stops.
- Do steps 1–5 again, three trials for each brand of battery in each experimental group.
- For the camera flash push the flash button every 30 seconds and measure the voltage every 5 minutes.
- For the flashlights rotate each battery brand so each one has a turn in each flashlight.
- For the CD player repeat the same song at the same volume throughout the tests.
Your turn!
Create a list of steps will you take to answer your scientific question
Tip: Make sure every item you use in your procedure is listed with your materials.
My procedure is as follows: _______________________________________
Step Seven: Collecting Data
How to Collect Data
Scientists often use tables, charts, diagrams, and graphs to conduct experiments. You might consider sketching your results, and make sure to take pictures of your project along the way!
Data tables will also come in handy. You probably need a row for each time you did the experiment, a column listing what the independent variable was (what you chose to test), and what happened in response (the dependent variable).
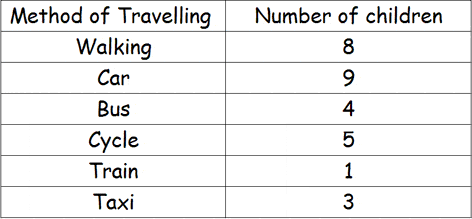
Table example
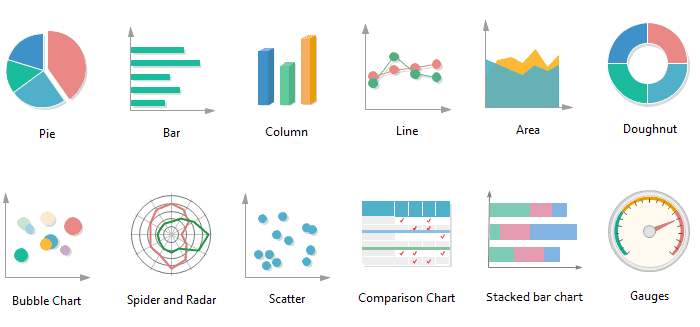
Chart Example
Your turn!
Create a chart, table, or graph to represent the data you’ve collected
Tip: Look back on your variables from Step 5 to set up your data
Learning from Fun
Step Eight: Finding a Conclusion
How to write a Conclusion
Your Conclusion should say...
Question 1
Question 2
Question 3
Question 4
Question 5
Your turn!
Write one paragraph summarizing what happened in your experiment and
what you can conclude from those results.
Step Nine: Presenting the Idea
Time to Present what you've done!
There are countless unique ways to present your work. Get creative and showcase each step of this guide. Speak clearly and slowly to best display your hard work!
Option 1: Posters
Option 2: Videos
Option 3: Photos
Option 4: Podcast
Option 5: Slideshow
Your turn!
Create a 4 to 5 minute presentation about your project, using any option you’d like!
Tip: remember to include the information from each step on this guide
Amazing! You’re ready to present. Practice with your STEM Facilitator and present for all your friends and family at Project Exploration’s annual Reflection of Knowledge